Nextcloud Home Server on Raspberry Pi 4
A guide how to install a Nextcloupi image on a Raspberry Pi 4. The boot volume will be a hard drive.
In order to host our own Bitwarden Password Manager beside Nextcloud we will install Docker, Portainer and Nginx.
What we need:
- Raspberry Pi (i prefer a Rasperry Pi 4 with at least 4GB ram)
- a ssd hard drive
- a usb to sata adapter like this one (https://www.amazon.de/gp/product/B00N4JLNXM/ref=ppx_yo_dt_b_asin_title_o00_s00?ie=UTF8&psc=1)
- BelanaEtcher (for Windows users to write the image to the ssd)
- 1.) Installing Nextcloudpi
- 2.) Changing ports
- 3.) Installing Docker
- 4.) Installing Portainer
- 5.) Installing Nginx
- 6.) Installing Bitwarden
- 7.) Backup
- Additional Steps
1.) Installing Nextcloudpi
- get the NCP Image here:
https://ownyourbits.com/downloads/NextCloudPi_RPi_03-02-22/NextCloudPi_RPi_03-02-22.tar.bz2
- for Windows: donwload and install belanaEtcher
- in settings: activate "Unsafe mode", so it also detects your hard drives

- now connect the SSD to your Raspberry
- don't forget to connect the pi to your network (for this method i postulate a cable connetion)
- let the pi boot up; this may take some minutes
For the next step i will redirect to the offical nextcloudpi guide until my own documentation will be ready
https://docs.nextcloudpi.com/en/how-to-access-nextcloudpi/
If your Raspberry will not boot from your SSD drive, maybe it still needs some files changed.
- put back the SSD back into your computer
- get the needed files for ssd boot from here:
https://github.com/raspberrypi/firmware/archive/master.zip
- extract the files somewhere on your computer
- go into the boot folder inside the folder you just extracted
- copy over all the files that end in .elf or .dat to the boot volume of your USB drive (replacing the same-named files that already exist there)

- now connect the SSD to your Raspberry
- don't forget to connect the pi to your network (for this method i postulate a cable connetion)
- let the pi boot up; this may take some minutes
For the next step i will redirect to the offical nextcloudpi guide until my own documentation will be ready
https://docs.nextcloudpi.com/en/how-to-access-nextcloudpi/
2.) Changing ports
In order to get the port 80 and 443 free for Nginx later, we need to change the port of the Nextcloud apache server.
- open an ssh terminal of your joice (like putty for Windows) and connect to the pi via ssh
- type in:
sudo nano /etc/apache2/ports.conf

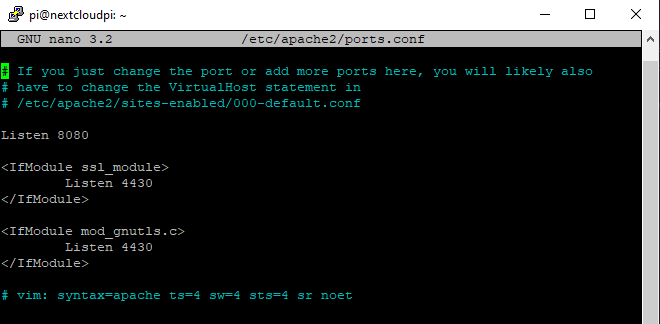
- look for port 80 ; change it to 8080
- look for port 443 ; change it to 4430
- save with STRG+O and exit out with STRG+X
- type in :
sudo nano /etc/apache2/sites-available/000-default.conf

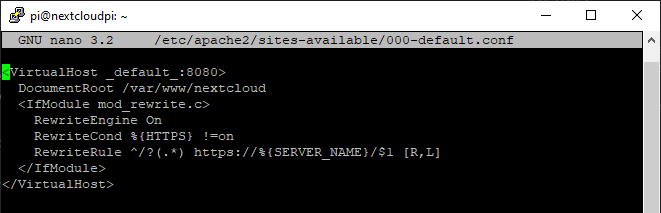
- search for virtualhost ; change ist to 8080
- type in :
sudo nano /etc/apache2/sites-available/nextcloud.conf


- search for virtualhost ; change it to 4430
- save with STRG+O and exit out with STRG+X
- now your Nextloud web page will be accessable under port 8080 and 4430 for ssl
3.) Installing Docker
- connect via ssh to your pi
- type in:
sudo apt update- type in:
sudo apt upgrade- type in:
curl -sSL https://get.docker.com | sh- type in:
sudo usermod -aG docker pi- type in:
sudo apt-get install -y libffi-dev libssl-dev- type in:
sudo apt-get install -y python3 python3-pip- type in:
sudo apt-get remove python-configparser- type in:
sudo pip3 -v install docker-compose
I create a main directory for all my docker container config files and appdata.
In my case it is /media/dockerdata

- type in:
sudo mkdir /media/dockerdata
4.) Installing Portainer
- connect via ssh to your pi
- type in:
sudo docker pull portainer/portainer-ce- type in:
sudo docker run --restart always -d -p 9000:9000 -v /var/run/docker.sock:/var/run/docker.sock -v /media/dockerdata/portainer:/data portainer/portainer-ce- now we are able to connect to Portainer via WebBrowser from our other computer by typing in http://ip-adress-of-your-pi:9000
5.) Installing Nginx
- connect via ssh to your pi
- we create now a directory for nginx, a config.json file and a docker-compose.yml
- go to your dockerdata directory; here it ist /media/dockerdata
- type in:
cd /media/dockerdata-type in:
sudo mkdir- type in:
cd nginx- type in:
nano docker-compose.yml- paste in: but change the DB_MYSQL_PASSWORD
version: "3"
services:
  app:
    image: 'jc21/nginx-proxy-manager:latest'
    restart: always
    ports:
      # Public HTTP Port:
      - '80:80'
      # Public HTTPS Port:
      - '443:443'
      # Admin Web Port:
      - '81:81'
    environment:
      # These are the settings to access your db
      DB_MYSQL_HOST: "db"
      DB_MYSQL_PORT: 3306
      DB_MYSQL_USER: "npm"
      DB_MYSQL_PASSWORD: "npm"     # please change this
      DB_MYSQL_NAME: "npm"
      # If you would rather use Sqlite uncomment this
      # and remove all DB_MYSQL_* lines above
      # DB_SQLITE_FILE: "/data/database.sqlite"
      # Uncomment this if IPv6 is not enabled on your host
      # DISABLE_IPV6: 'true'
    volumes:
      - ./data:/data
      - ./letsencrypt:/etc/letsencrypt
    depends_on:
      - db
  db:
    image: 'jc21/mariadb-aria:latest'
    restart: always
    environment:
      MYSQL_ROOT_PASSWORD: 'npm'
      MYSQL_DATABASE: 'npm'
      MYSQL_USER: 'npm'
      MYSQL_PASSWORD: 'npm'      # same as above
    volumes:
      - ./data/mysql:/var/lib/mysql
- paste in:
docker-compose up -d- now you have access via webbrowser for your nginx proxy manager : http://ip-adress-of-your-pi:81
- on first login the credentials are
username: admin@example.com
passwrod: changeme
- create your hosts you need
For Apple Users:
You must add an additional line in your nginx config to avoid parsing errors
1.)
-edit your Nexcloud Proxy Host.
-go to advanced
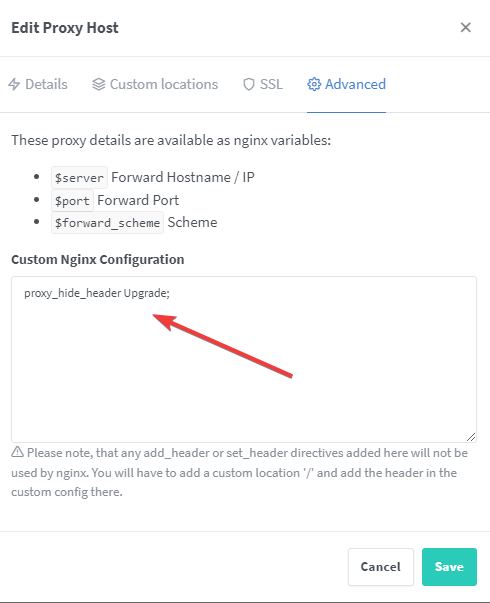
- type in:
proxy_hide_header Upgrade;
2.)
- connect via ssh to your pi
- type in:
sudo nano /etc/apache2/apache2.conf
- after this line : Header always set Strict-Transport-Security "max-age=15768000; includeSubDomains; preload"
- type in:
Header unset Upgrade
- save and exit (Strg+x, y, enter)
- reboot
6.) Installing Bitwarden
- create docker-compose.yml
- paste in:
version: '3'

services:
  bitwarden:
    image: bitwardenrs/server
    restart: always
    ports:
      - 6500:80
    volumes:
      - ./bw-data:/data
    environment:
      WEBSOCKET_ENABLED: 'true' # Required to use websockets
      SIGNUPS_ALLOWED: 'true'   # set to false to disable signups
- paste in
docker-compose up -d- creat your host for Bitwarden in Nginx if you want access to it over the internet; the port is 6500
- type in your browser your Bitwarden url
- create your account
- if you open your Bitwarden to the internet, everyone can create an account on your system!!
closing your Bitwarden for new users:
- there are two ways, one fast and one which gives you also access to the admin web page (which allows more settings to set up)
1.
- when all users you want to add are created on Bitwarden, go to portainer and duplicate the Bitwarden container
- change at ENV "SIGNUPS_ALLOWED = true" into "SIGNUPS_ALLOWED =false"
2.
- in order to get the Bitwarden admin web page:
- generate a token:
-type in your console:
openssl rand -base64 64- copy the generated token
- got to your portainer web console
- duplicate the Bitwarden container:
- add a ENV:
ADMIN_TOKEN = "paste_in_the_token_from_above"
- deploy the container
- you can access the admin page via https://your-bitwarden-url/admin
- under general setting type in your Bitwarden-url and save it
- now you can make the changes you want, disallow new signups etc.
- tip: if you set up the smtp email settings you can now invite new users via email
7.) Backup
Nextcloud Backup
- I use the backup from the nexcloudpi panel (https://ip-to-your-pi:4443) to make a full backup of my nextcloud, because it is so easy and it is even more easy when it must be restored.
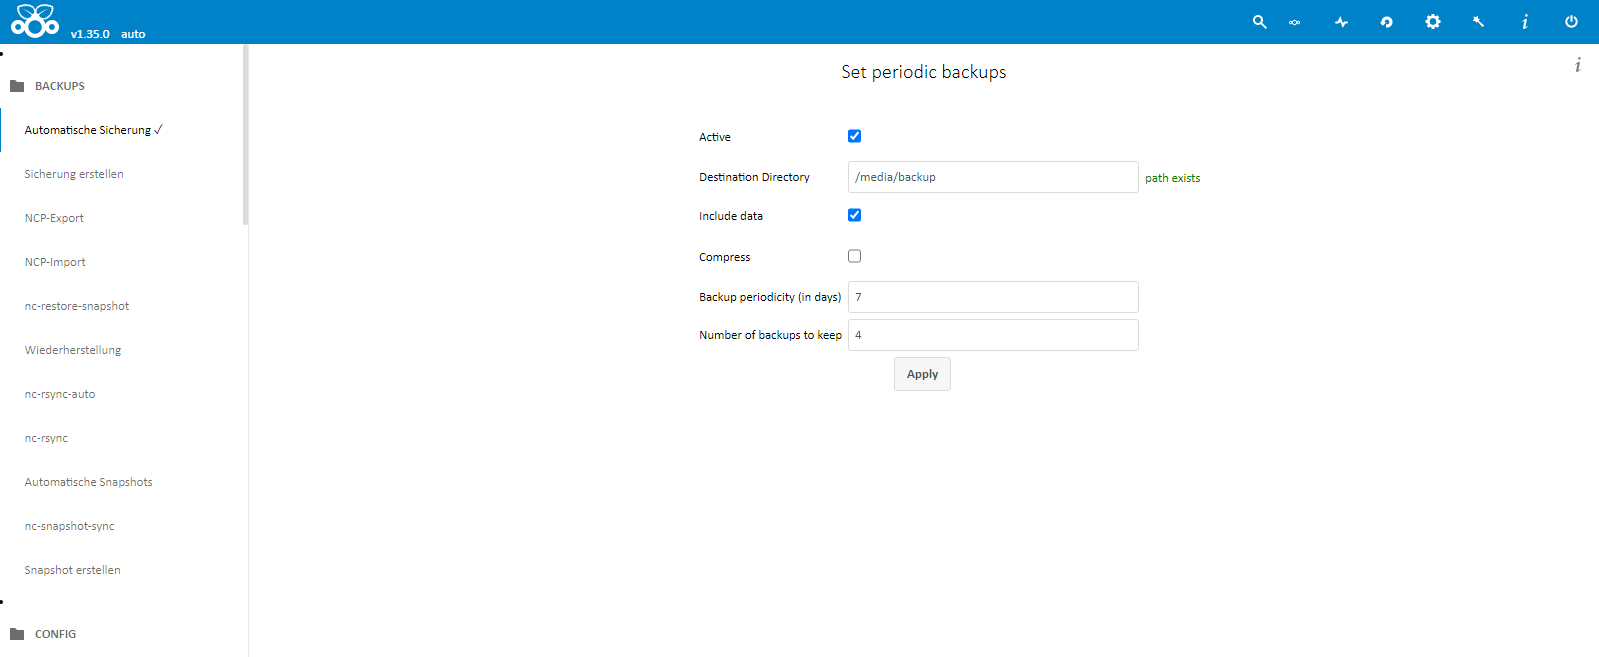
- Destination Directory : a valid path on your pi for your backup files
- Include data : if deactivated only your nextcloud configuration will be backup but not your files on you nextcloud
- Backup periodicity (in days) : days between the backups from now on
- Number of backups to keep : how many full backups you want to keep; check for enough free disc space
Docker Backup
- for my docker stuff i use a little backup script
- look where you want to store your backup files in; this will be the path for "backupdir" in the script
- make a directory for the backup script
mkdir backup- cd backup
nano backup.sh- copy this in
#!/bin/bash
#here are the variables you have to adjust----
dockerdata=/media/dockerdata                  #the folder where all my dockerfiles are stored in
backupdir=/media/backup                       #place where the backups are stored in
pi=/home/pi/                                  #home of pi , all my folder with the docker-compose.yml files are in here
#---------------------------------------
date

#create backup folder structure if not already done
date && mkdir $backupdir/dockerdata
date && mkdir $backupdir/home
date && mkdir $backupdir/home/pi

date && echo backing up Bitwaden-database...
date && sudo rsync --progress -h -a --delete $bitwarden $backupdir/bw-data
date && echo backing up Dockerdata...
date && sudo rsync -avSAXH --delete $dockerdata $backupdir
date && echo backing up home directory...
date && sudo rsync -avSAXH --delete $pi $backupdir/home/pi
date && echo backup complete
- save and exit (STRG+O ; STRG+X)
- make it executable
sudo chmod +x backup.sh
- now you can ran this scrip via a cron job daily at nigth (maybe 2:30)
- type in :
sudo crontab -e - copy this line at the end
30 2 * * * /home/pi/backup/backup.sh >> /var/log/backup.log 2>&1
- save and exit (STRG+O ; STRG+X)
now eyer night at 2:30 the script backup.sh which is in the folder /home/pi/backup will be executed and a log file will be written at /var/log/backup.log. There you can see if everything works fine. To open this log file, connect to your and type in :
nano /var/log/backup.logAdditional Steps
Secure the server
To make the server more secure we will
1. change the default ssh port and
2. we change from password authentication to key files.
1.
The default ssh port is 22. We change this to a random port: here we take the port 4200.
- connect to your server using PuTTY

- type in:
sudo nano /etc/ssh/sshd_config- search for
#Port 22
#AddressFamily any
- change it to
Port 4200
#AddressFamily any
here you can choose any port you like and is not yet used by another program
- save and exit (STRG+O ; STRG+X)
- retart the sshd deamon
-type in
sudo systemctl restart sshd
2.
In the next step we will create a keyfile that include a long an encrypted password that we will use for authentication in stead of a normal passphrase.
Here i will show the way with a Windows PC and the program Putty. You can get it here:
https://www.ssh.com/ssh/putty/download
After downloading and installing Putty
- start PuTTYgen
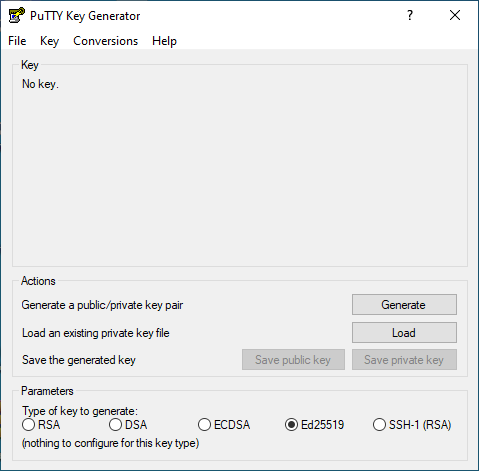
- change Type of key to generate: from "RSA" to "ED25519"
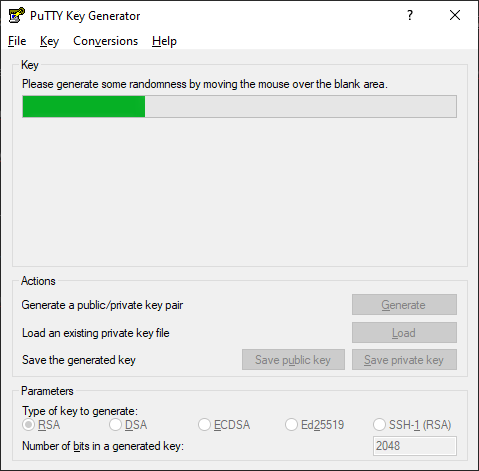
- than klick Generate
- move the mouse over the blank area under the green bar
- replace the comment with something more specific for you connection; here it is the nextcloud server so i choose "nextcloud"

- now copy the shown key
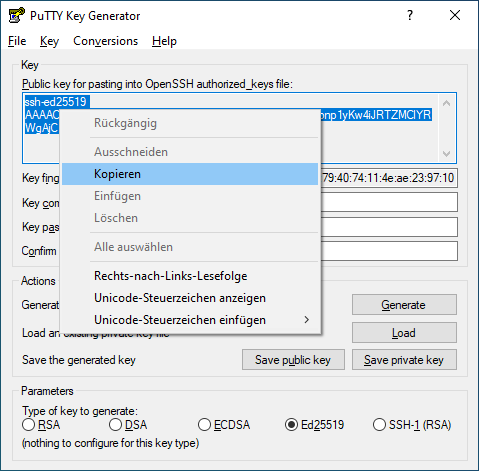
- save this in a simple text file on your computer for later
- click on "Save private key" and save it on your computer
- you will be asked for a passphrase, this is to protect your private key file. It's up to you if you want to.
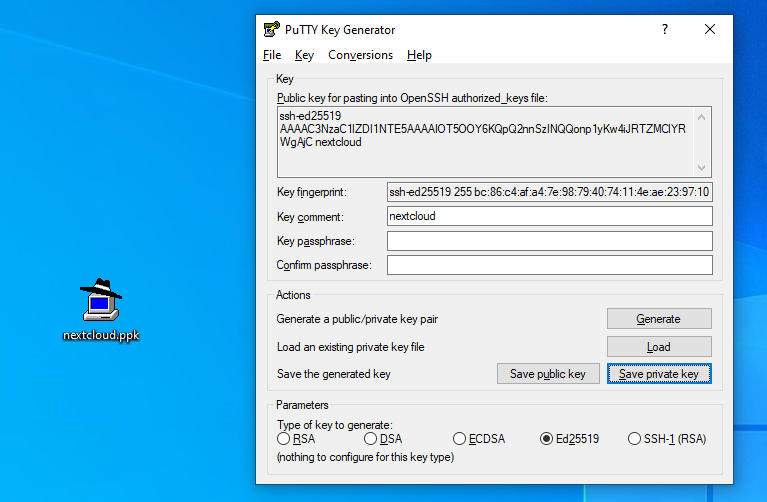
- this .ppk file (here it is the nextcloud.ppk) is your secure private key and nobodyelse should have this. Please keep it save!
- now log into your server you want to secure with this key using PuTTY
- look if there is already a hidden .ssh folder in your home directory type in:
ls -la
- if not, create one type in:
mkdir .ssh
- change into this directory, type in:
cd .ssh
- type in:
nano authorized_keys- copy the key you saved in a text file earlier
- save and exit (STRG+O ; STRG+X)
- now you can connect via putty to your server using your .ppk key file
- open PuTTY
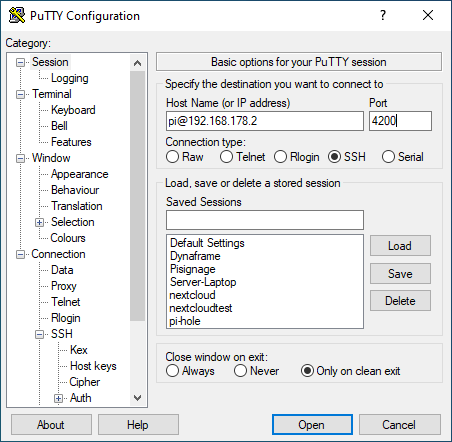
- type in your hostname and port
- on the left got to >"Connetion" >"SSH" >"Auth"
- click on "Browse"
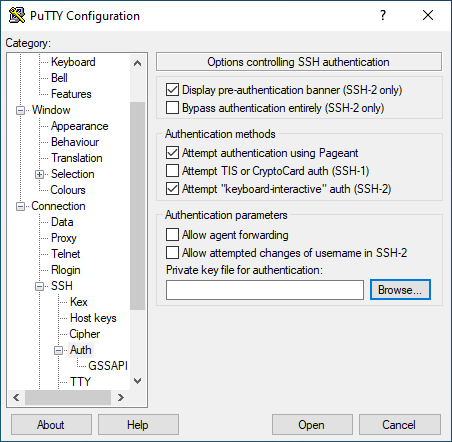
- select your private key file (.ppk)
- go back to "Session" and under "Save Sessions" give it a name and click "Save"
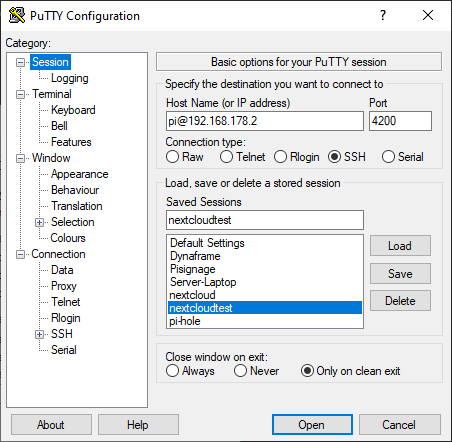
Now you have successfull saved your connection to your server with a key file.
When everything works fine and you can connect with your new keyfile it's time to disable the password authentication for ssh.
- connect to your server
- type in:
sudo nano /etc/ssh/sshd_config
- search for:
#LoginGraceTime 2m
#PermitRootLogin prohibit-password
- change it to
#LoginGraceTime 2m
PermitRootLogin no
- this disables the possible login via the user: root
- next search for:
# To disable tunneled clear text passwords, change to no here!
#PasswordAuthentication yes
- change it to
# To disable tunneled clear text passwords, change to no here!
PasswordAuthentication no
- save and exit (STRG+O ; STRG+X)
- restart the ssh deamon;
- type in:
sudo systemctl restart sshdNow your server allows no longer connections without a key file.
Fail2ban
Fail2Ban is an intrusion prevention software framework that protects computer servers from brute-force attacks.
More on https://en.wikipedia.org/wiki/Fail2ban
UFW - Uncomplicated Firewall
More here https://help.ubuntu.com/community/UFW
ddnss.de
https://9minuti.com/ddns-updater-with-docker-and-raspberry/
Error "/.well-known/caldav" etc
- go to your Nginx Proxy Manager web page.
- for your Nextcloud
Einfach bei NPM zu den ProxyHosts -> bei der passenden Domain auf "Edit" und in dem neuen Fenster auf "Advanced"
und die Werte eintragen:
location /.well-known/carddav {
return 301 $scheme://$host/remote.php/dav;
}
location /.well-known/caldav {
return 301 $scheme://$host/remote.php/dav;
}
Edited September 29 by i-B4se